With the “infrastructure as code” renaissance, managing infrastructure has never been easier. Every change is easily recordable and reproducible and, because it’s all code, it’s never been easier to store a history of what’s changed to easily review in git log.
But short of running your own DNS servers and running custom scripts to convert code into a BIND zonefile, it’s historically been hard to manage DNS in the same way – so often, even though the servers themselves are easy to change, managing DNS means connecting to Route53, or Cloudflare, or any of a myriad of different domain registrars and DNS providers and manually changing fields in their application with no easy way to propagate changes across multiple domains or to roll back to a historical record if a new change causes something to break.
Using a tool like DNSControl, which allows a provider-agnostic view of DNS records as code, along with automatic capabilities to update records at your provides, fixes all of this.
What’s DNS?
Every desktop, phone, server or WiFi-enabled toaster on the Internet is represented by an IP address; computers use these IP addresses to talk to other computers. People, for the most part, don’t want to keep a grimoire on hand full of “Search engine: 184.72.104.138, source code host: 140.82.114.4, etc.”, so instead we use DNS, the domain name system, to match it all for us. Instead of going directly to “184.72.104.138”, people can just tell their computer to go to “duckduckgo.com” and DNS translates that to “184.72.104.138”.
If you’re running any services of your own, you’re familiar with configuring DNS through a DNS host – and unless you’re running your own DNS server, you’ve felt some pains with having to manage all of your records through some custom web application you try to avoid as often as possible.
What’s CI/CD?
Historically, the software development cycle has been pretty manual. You’ve got some source code in a repository, someone submits a pull request, you’ve got to manually look through the request, attempt to build it and see if it works, run it through your tests, then, if everything looks good, you can finally merge it. Once you’ve merged that request or pushed your own commits, you’d then have to manually connect to the server running your application, pull in the new code, run whatever build steps you have, and then run the newly rebuilt application – it’s a bit of a process.
CI/CD is a combination of two components that simplify this: Continuous Integration, the technique of continually and systematically reviewing, checking and integrating changes to your source code and Continuous Deployment, then process of automating your deployment to automatically build and deploy on updates to the source code. These are both generally managed by specific CI/CD applications which integrate with your code repository, GitLab and GitHub are both starting to integrate CI/CD tools directly to their platforms.
Using DNSControl to Manage Your DNS
DNSControl is an open source tool from StackOverflow for programmatically managing DNS records. As long as you have a working Golang installation, you can install DNSControl with:
go install github.com/StackExchange/dnscontrol/v4@latestSetting up credentials
DNSControl only needs two files to get started, creds.json and dnsconfig.js. If you’re running DNSControl manually, your creds.json file can be configured with your DNS provider’s API details – because we’ll be focusing on using DNSControl within a CI/CD context, we’ll be pulling the API keys from environmental variables. This example uses Cloudflare as our DNS provider and Gandi as our domain registrar; the DNSControl website contains a full list of supported providers.
{
  "gandi": {
    "apikey": "$GANDI_V5_TOKEN"
  },
  "cloudflare":{
    "apitoken": "$CLOUDFLARE_API_TOKEN"
  }
}
Setting up dnsconfig.js
Now that DNSControl knows how to talk to some providers, we just need to tell it what records need to exist. DNSControl supports basically every form of record, but we’re going to stick with the basics for this example.
// Providers:

var REG_GANDI = NewRegistrar('gandi', 'GANDI_V5'); // Gandi
var DNS_CF    = NewDnsProvider('cloudflare', 'CLOUDFLAREAPI');  // Cloudflare

// Domains:

D('example.com', REG_GANDI, DnsProvider(DNS_CF),
    A('@', '1.2.3.4'),
    AAAA('@', 'fdf8:f53b:82e4::53')
);
Breaking this down, we start off by defining our providers. In this example, we use both a registrar and DNS host with supported providers – for maximum “not having to sign into a strange web panel”, this is recommended, but if your preferred registrar doesn’t offer an API or DNSControl currently doesn’t support them, instead of REG_GANDI you can use:
var REG_NONE = NewRegistrar('none', 'NONE');

D('example.com', REG_NONE, ...);
This allows DNSControl to still manage records for the domain through your preferred DNS provider, but you will need to manually update the nameservers at your registrar to point to the DNS provider.
Once we’ve defined the providers for our domain, we can start adding domains using D(domain, registrar, dns_provider, ...) where everything after is a list of DNS records.
Note: If you already have DNS set up at a supported provider, you can use dnscontrol get-zones --format=js <name in creds.json> <provider name> <domain> to convert your existing records into content you can almost copy/paste into your dnsconfig.js file – e.g.
$ dnscontrol get-zones --format=js cloudflare CLOUDFLAREAPI example.com
var cloudflare = NewDnsProvider("cloudflare", "CLOUDFLAREAPI");
var REG_CHANGEME = NewRegistrar("ThirdParty", "NONE");
D("example.com", REG_CHANGEME,
        DnsProvider(cloudflare),
        A('@', '1.2.3.4')
)
Going live
Finally, with our providers set and our records configured, we can go live. For this process, there are three commands we can use to make sure everything is good to go:
dnscontrol checkreviews the configuration to make sure nothing is broken. This does not access providers or validate credentials, but it does make sure your syntax is right – it’s not always necessary but it helps to make sure there isn’t a comma missing somewhere in your dnsconfig.dnscontrol previewpulls the existing records for each domain in your configuration and shows what changes will be made but does not apply any changesdnscontrol pushpushes the dnsconfig to your domain and DNS providers. This will update nameservers at the domain’s registrar (assuming you’re not usingREG_NONE) and will replace all existing records for the domain with the dnsconfig records.
Both the preview and push commands also support the --domains flag, which allows us to review and make changes only for the specified domains.
Using GitLab for Continuous Deployment
GitLab is a project management platform with support for code hosting, issue tracking, and built-in CI/CD functionality; although not quite as instantly recognizable as some of its competition, such as GitHub, GitLab is one of the largest players in the industry and, because its core offering is fully open source, is a great choice for a full-featured self-hosted Git forge.
Setting up .gitlab-ci.yml
The .gitlab-ci.yml file controls the CI/CD process for GitLab’s built in runners system. There’s a lot of options for configuring the CI system to do everything you need, for this we’ll focus mainly on “test that our dnsconfig.js can be parsed” and “push the changes.” To start off, we’ll break down our finished .gitlab-ci.yml:
before_script:
    - curl -Lo dnscontrol https://github.com/StackExchange/dnscontrol/releases/download/v3.2.0/dnscontrol-Linux
    - chmod +x ./dnscontrol

build:
    stage: build
    script:
        - ./dnscontrol check

test:
    stage: test
    script:
        - ./dnscontrol print-ir

deploy:
    stage: deploy
    script:
        - ./dnscontrol push
    only:
        - master
Our CI follows the standard build → test → deploy pipeline. If any of these steps fail, the entire pipeline stops; this ensures our CI system never tries to push a live change if build stage can’t build or if any of the tests fail.
- Before any of these stage, GitLab runs
before_script, which sets up the environment consistently for each stage. In our example, we use this stage to download the (at the time of writing) most recent DNSControl binary and ensure it’s executable. If the system running this build script already has DNSControl installed globally, this step may not be necessary. - The first stage to run is
build. For us, the build stage doesn’t actually do anything, but if we wanted to write our dnsconfig in TypeScript or something similarly unique, we could compile our code in this step. - The second stage is
test, which is pretty self-explanatory. Again, we’re using a very bare-bones example, which doesn’t have any unique tests. In our example, we use theprint-ircommand in DNSControl, which outputs a JSON representation of our entire DNS configuration. If we wanted to add additional checks to ensure every domain has MX records to receive mail, every domain has an A/AAAA record on the apex domain to point to a web page, or any other kind of tests, we could write additional scripts to parse the JSON representation and validate the contents during this stage. - Lastly, the third stage is
deploy. This stage has the least amount of extra fluff we could add, once we’ve made sure the source code builds and passes our tests, all we have left to do is make it go live. In our example, we set theonlyvalue tomaster, signifying we only want to run this stage of our pipeline on the master branch – otherwise we’d be trying to deploy on every branch, which may not be optimal if we’re in the process of refactoring something.
Configuring GitLab
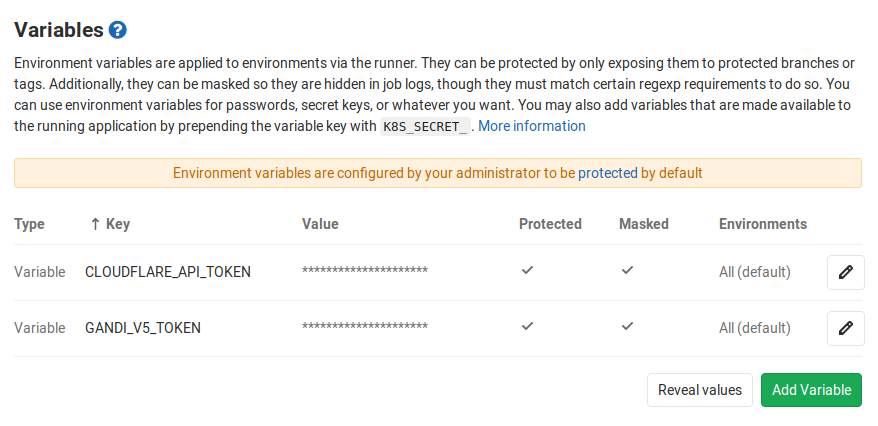
As long as our GitLab instance already has a runner available for our project, the only other configuration needed is setting our environmental variables. From our project’s main page, we’ll need to navigate to Settings → CI/CD and set our API key environmental variables there. Once completed, the Variables section should look something like this:
Wrapping It All Up
Now that we’ve setup our DNSControl repository and configured our CI/CD settings, managing our DNS infrastructure as code is just a git push away.
Edit Notice
This post last updated 31 Dec 2023 to update 3rd party links to DNSControl’s current website. Some commands and code samples have also been updated to follow current DNSControl best practices.
Mirror Notice
This post was originally mirrored from my posts on the Sporks community blog. Comments are disabled on this site’s mirror, but you may contribute any comments there.